


Hot Frugal Holiday Must Haves!
Showing posts with label craft. Show all posts
Showing posts with label craft. Show all posts
Thursday, October 7, 2010
Simple DIY Custom Designs with Fabric Yo-Yo’s
Monday, September 20, 2010
Customized Party Invitations for Pennies on the Dollar!
This post is a re-run from the League of Super Heros and Villains Invitations post in 2009 with some significant improvements, clearer instructions and larger images so you can make your own party invitations too.
Last year J wanted a super hero slash super villain party theme. To keep things on the cheap, I had the kids arrive in their favorite Halloween costumes. Princesses can be super heroes too!
To save even more money on party invitations, I got really creative and made them from supplies I already had lying around the house. I downloaded the Star Wars font to add a graphic novel flair to the invites! I searched online until I found a graphic I liked. (Remember to check copyright and user agreements before using any image from a site.) I uploaded it on Photobucket to add some text but this can done in Photoshop or some other photo editing software.
Once the imagery is set up, onto wording the invitation. Wording the invitation is a critical step in establishing a great theme right off the bat! I searched the internet for phrasing ideas. This was the hardest part!
Thursday, June 24, 2010
Homecoming is Here!!!
Hubby finally made it home! We had the house decorated with streams and a “Welcome Home” banner I made with the help of my Cricut machine and Glue Dots. He really loved the whole party atmosphere. Helium balloons and confetti would have made it even better but I’m working on a low budget right now plus the cleanup would have been a b#$%@!!!

Tuesday, June 8, 2010
Glidden’s Paint Testers Got You Covered
This is a Sponsored Post written by me on behalf of Glidden. All opinions are 100% mine.
Glidden Paint gave away 2 paint testers earlier this week plus 2 more to give away to friends. I wasn’t fortunate enough to win some new paint but maybe next time.

I do enjoy using their paint testers. They come with a paint brush in the lid so I don’t have any extra supplies to purchase. These handy dandy testers are the perfect size for small painting projects like picture frames or jewelry boxes and of course touch ups for around the house.
Speaking of touch ups around the house, it won’t be long before our walls will need repainted. I’ll be sure to get a Glidden paint tester in the color I use on the walls to make touchups easier. Wild Man went through a phase where he wrote on walls with whatever he could find; marker, pen, pencil, lipstick, fingernail polish. You name it, he wrote on our walls with it! I have scrubbed my walls with just about everything I could find and you can still see the marks in some areas. The paint testers would have been significant time saver but I didn’t paint these walls so who knows what color would match!
Glidden Paint gave away 2 paint testers earlier this week plus 2 more to give away to friends. I wasn’t fortunate enough to win some new paint but maybe next time.
I do enjoy using their paint testers. They come with a paint brush in the lid so I don’t have any extra supplies to purchase. These handy dandy testers are the perfect size for small painting projects like picture frames or jewelry boxes and of course touch ups for around the house.
Speaking of touch ups around the house, it won’t be long before our walls will need repainted. I’ll be sure to get a Glidden paint tester in the color I use on the walls to make touchups easier. Wild Man went through a phase where he wrote on walls with whatever he could find; marker, pen, pencil, lipstick, fingernail polish. You name it, he wrote on our walls with it! I have scrubbed my walls with just about everything I could find and you can still see the marks in some areas. The paint testers would have been significant time saver but I didn’t paint these walls so who knows what color would match!
Thursday, April 1, 2010
Custom Wall Tile Decor Project for LESS Than $10
 |
| Custom Wall Tile Gift Project |
I had some extra blue ceramic bathroom tiles I bought from a yard sale a couple years ago. Since it's an odd number, coasters were out but I didn't want them to go to waste so I finally found a way to put them to good use.
I created these in homage to my boys! As I look at each tile, I see a different aspect of my childrens' personality. I loved how they turned out and here's a quick run down of how I made these personalized wall tiles!This is an easy and cheap way to create customized family wall decor.

Costing under $10, I utized Modge Podge
 , 4” ceramic tiles (or any size you might have on hand), picture hanging wire and hot glue I already had on hand. My only out of pocket expenses were the chipboard images found in the sticker section of the craft store and Glaze spray paint
 (completely optional).
Monday, March 22, 2010
From Tile to Chalkboard - See How It's Done
I am at Make It From Scratch today. Pop on over to see how to make these fabulous Tile Chalkboards perfect for any kids room or even mom's kitchen!

Friday, March 19, 2010
Incredibly Easy Tile Coaster Project for Kids
 Later today I am heading back to school! No - not to further MY education or to discuss my kiddo’s bad behavior at school. I am actually teaching a small class!
Can you believe it? I can’t. I am still in disbelief!
Technically it is called a mini-class only consisting of a single afternoon. The school reaches out to people in the community from all walks of life with varied skill sets to teach elementary students about a skill, hobby, craft, or other topic the “teacher” is comfortable teaching. The goal is to expose the kids something new to generate some excitement and interest in a new possible skill or hobby at a young age.
Thursday, March 18, 2010
Make a Tiered Birthday Cake Pincushion with the DIY Dish

The First Webisode!
This week is their first webisode so they appropriately showed us how to make a tiered birthday cake pincushion. I LOVE this! I've got felt and fabric in my stash so the idea of making an oversized cake with some gorgeous decorations makes me giddy. The shocking thing about it...the simplicity of the idea. Virtually NO SEWING is required yet you can make them in so many different shapes and colors. It's amazing and I'm left wondering, "Why didn't I think of that?"
Thursday, March 4, 2010
Tidbits: $160 P&G Saver THIS Sunday, Win a 32" Flatscreen TV + Rediscover the Joy of Coloring
Here's a few tidbits I thought you'd love to hear about.
 Check Sunday's (March 7th) newspaper for a HUGE Proctor & Gamble coupon insert. Over $160 of savings will be in this Sunday's paper on products like Pantene, PUR, Tide, Venus, Olay, Swiffer, Pampers, and other popular P&G brands.
Bonus: For every coupon redeemed, Proctor & Gamble will donate a days worth of clean drinking water to a child in need through the Children's Safe Drinking Water Program. This is P&G's philanthropic cause aimed at providing clean drinking water to children in developing countries.
Click here to find a local paper that carries the P&G SAVER coupon book.
 NoBetterDeal is giving away a 32" Flatscreen TV as they celebrate their popular meme they started in December. (There's no #BetterDealThan _____.)
Simply complete the entry form and you are entered. Be sure to join them next week for a great Twitter party/contest/giveaway. March 12th at 9pm EST #NoBetterDeal tweets will enter you for even more prizes. Click here for the deets!

Bonus: For every coupon redeemed, Proctor & Gamble will donate a days worth of clean drinking water to a child in need through the Children's Safe Drinking Water Program. This is P&G's philanthropic cause aimed at providing clean drinking water to children in developing countries.
Click here to find a local paper that carries the P&G SAVER coupon book.
*Above information courtesy of One2One Network*
~~~~~~~~~~~~~~~~~~~~~~~~~~~~~~~~~~~~~~~~~~~~~~~~~~~~~~~~~~~~~~~~~~~~~~~~~~~~~~~~~~~~~~~~~~~~~~~~~~~~~~~~
~~~~~~~~~~~~~~~~~~~~~~~~~~~~~~~~~~~~~~~~~~~~~~~~~~~~~~~~~~~~~~~~~~~~~~~~~~~~~~~~~~~~~~~~~~~~~~~~~~~~~~~~
Simply complete the entry form and you are entered. Be sure to join them next week for a great Twitter party/contest/giveaway. March 12th at 9pm EST #NoBetterDeal tweets will enter you for even more prizes. Click here for the deets!
*This post is not compensated but it does provide me an entry for the Nintendo Wii courtesy of NoBetterDeal and Global Influence*
~~~~~~~~~~~~~~~~~~~~~~~~~~~~~~~~~~~~~~~~~~~~~~~~~~~~~~~~~~~~~~~~~~~~~~~~~~~~~~~~~~~~~~~~~~~~~~~~~~~~~~~~~
~~~~~~~~~~~~~~~~~~~~~~~~~~~~~~~~~~~~~~~~~~~~~~~~~~~~~~~~~~~~~~~~~~~~~~~~~~~~~~~~~~~~~~~~~~~~~~~~~~~~~~~~~
Need to decompress? Try coloring pages for MOM. These are advanced style coloring pages that will allow you or your older teen children to get creative and rediscover the joys of coloring.
*Information courtesy of The Mom Blogs
Sunday, February 14, 2010
President’s Day 2010
Happy President’s Day!

President’s Day is celebrated on the 3rd Monday in February to honor George Washington and Abraham Lincoln’s birthday. February 22 and February 12 respectively. Here some fun ways to celebrate the day while keeping the kids occupied while they are home for the day.
Honor the day by spending some crafty time with the kiddos. Here are some free ideas from Kaboose and Enchanted Learning.

I love to celebrate holidays with food. I’m a foodie kind of gal. You can go with a fun theme like Rachel Ray’s Presidential Feast but there’s nothing wrong with a simple All American meal either. Burgers, hot dogs, fries, with all the trimmings laid out. Onions, tomato, lettuce, cheese, chili, mustard, ketchup, you name it. It’s all good!!! Follow it up with a birthday cake or other sweet treat. We still have birthday cake from J-Man’s birthday last Thursday, so I’m thinking Paula Deen’s Cherry Cheesecake would be a great finish to our President’s Day Feast.

So how are you celebrating President’s Day this year?
Tuesday, February 9, 2010
Have a Kickin Valentine's
It's hard to find boy themed Valentines that aren't cheesy or "lame" as my son would say...especially the older he gets. This is why I planned to make some awesome Valentine's that are macho and play right to my kid's preferences.
 After dealing with a horrible sinus infection for over two weeks, I didn't have the energy or time to find all the supplies to execute this idea properly AND make all the goodies we are suppose to take to his Valentine's Day school party. On top of Valentine related planning, I am planning J-Man's birthday excursion. (His birthday is Thursday and am obligated by the universal mom code to make cupcakes for the class. This is the day BEFORE the Valentine's Day party so I'm going to be a busy little bee the next few days.) Oh well...onto the back up plan.

My original idea was to create Secret Mission Valentines for J-Man. He loves all the Super Secret Spy stuff so I thought this would be a nice way to "man up" a valentine. I had grand plans of making tiny mission folders with secret missions, code words, along with spy glasses (black rimmed sunglasses with a red film inserts). I had dreams of making him a cool sleek black briefcase to take his Secret Mission Valentines to school, dress him in a button up shirt, black tie, black rimmed sunglasses, and slick hair. You know, like those guys in the Matrix or Mission Impossible (before they're all banged up from fighting some sort of terrorist on a boat or plane that blew up with them on board somehow killing the bad guy but the devilishly handsome good guy walks away with a little limp, some dirty smudges around his face but otherwise in great shape and wrinkle free clothes!) That was the look I was aiming for but alas those dreams of a Secret Spy Valentine haved dissolved.
After dealing with a horrible sinus infection for over two weeks, I didn't have the energy or time to find all the supplies to execute this idea properly AND make all the goodies we are suppose to take to his Valentine's Day school party. On top of Valentine related planning, I am planning J-Man's birthday excursion. (His birthday is Thursday and am obligated by the universal mom code to make cupcakes for the class. This is the day BEFORE the Valentine's Day party so I'm going to be a busy little bee the next few days.) Oh well...onto the back up plan. The back up plan is simple. J-Man takes Taekwondo and loves it so I thought a Martial Arts inspired Valentine would be perfect for my little guy! With his help and invaluable input we worked out his new Valentine this afternoon. It's not as elegant as the one I originally planned but it does not require any cutting or pasting. He helped make it and we're awefully proud. I'll even share it with you in case you need a quick original Valentine. (Just click the image to open a new window to either download or print the image for you own use)
The Karate Valentine is printed on plain white paper with a 1/4 page fold so it's economical and you only print what you need. All the images used are from free clipart so it didn't cost us anything to make. Just a few minutes together which is priceless!
The Karate Valentine is printed on plain white paper with a 1/4 page fold so it's economical and you only print what you need. All the images used are from free clipart so it didn't cost us anything to make. Just a few minutes together which is priceless!
Friday, December 11, 2009
It's a Handmade Holiday PLUS a Giveaway
Every year I toss in some handmade gifts to all our family and friends. It's cost effective plus it is fun for me. A creative outlet to rid myself of the nervous holiday energy that builds up this time of year is vital for my sanity! It is also fun to see the recipient's expression when they realize "I made THAT!!"
For those of you who don't consider yourselves very crafty, You Can Make This is at your rescue. They have a complete library of crafty tutorials ranging from easy and beginner basics to more complex. They cover the whole spectrum of Do-It-Yourself projects. Sewing. Embroidery. Quilting. Painting. Printables. Scrapbooking. Knitting. Crotcheting. Even polymer clay. They have ideas for the home, wearables, teen and boy projects and a great selection of homemade toy tutorials. I love it! Their patterns are easy to read and end up looking as if Courtney, the site's creator, made them herself!

With the holidays just around the corner, we thought it would be fun to showcase some quick and easy gift ideas you can give to friends, neighbors, co-workers, and oh yes…even your family! You can enter to win eBooks from www.YouCanMakeThis.com and learn some fun new techniques, tips, and ideas not only for the people on your list, but also creative ways to decorate your home!
To personalize your gift giving even more this year, You Can Make This has created a free download for some fun gift tags. Each of them coordinate with ideas found as part of the DIY Gift Giving Series videos that can be found at www.youcanmakethis.com/blog , as well as designs and patterns found at www.SWAKembroidery.com and www.YouCanMakeThis.com.
PSSST: You can also enter to win hundreds of dollars in gift certificates just for watching the videos that are part of the DIY Gift Giving Series and answering a question on the You Can Make This blog! I've been entering for my chance to win and so should you!
Handmade Holiday Giveaway!!!
Winner's announced: Deborah's comment #22 and Annie's comment #2 were the two comments randomly drawn!
You Can Make This has generously offered TWO Frugal Front Porch Readers a bundled package of downloadable instructions/patterns for the Kimberbell Kids 24" Doll and Gift Giver patterns.

Bonus Entries: (please include appropriate links to your entry for validation)
Winner's announced: Deborah's comment #22 and Annie's comment #2 were the two comments randomly drawn!
You Can Make This has generously offered TWO Frugal Front Porch Readers a bundled package of downloadable instructions/patterns for the Kimberbell Kids 24" Doll and Gift Giver patterns.

Here's the entry details
Mandatory Entry: Visit You Can Make This and tell me your favorite toy patternBonus Entries: (please include appropriate links to your entry for validation)
- Share this on twitter and/or your other social media sites - 1 entry per site but please don't spam your followers
- Blog about this contest - 5 entries
- Comment on any other post - 1 entry
- Follow or subscribe to Frugal Front Porch - 1 entry
- Follow me on twitter or facebook - 1 entry
- Comment on a blog post at www.youcanmakethis.com/blog - 1 entry
- Purchase a pattern from You Can Make This - 5 entries

*Disclosure time > I received a free pattern as a courtesy for offering this giveaway to you! I have not been compensated in any other way. All banner links to You Can Make this are my affiliate links but you text links are simple links.
Thursday, December 3, 2009
Fabric Covered Bead Necklace - Sooo Very Fashionable!
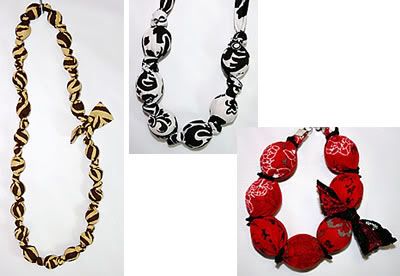 I'm still suffering from a migraine that simply won't let go but I did catch this nugget of craftiness when it eased up earlier so I had to share this with you.
Is this not the cutest girlfriend gift idea??? I love it and will be making many of these!
Be sure to check out You Can Make This Blog during the month of December for more great holiday gift ideas that are quick and easy on the budget!
Here's a quick video where Courtney show's us how to make it ourselves! I cannot wait to get rid of this headache so I can get started!
Another thing, Courtney's got a fabulous giveaway going on at YCMT. Click the image below to get all the details.

Monday, October 12, 2009
Hand Soap - Semi Homemade Style
Last week I shared this idea with the readers of Make It From Scratch where I contribute every Monday. This week, I thought I'd share it with all my readers who may not have seen it.

We traveled quite a bit last summer for hubby's doctor's visits. We stayed overnight at various hotels because hubby couldn't physically handle the long road trip back home. Thankfully he's better and we're no longer traveling so much but it's left me with a rather large collection of hotel soaps. What to do with them???
Here's a nifty little project you can do with hotel soaps or any bar soap bits you have lying around the house.
It literally takes less than ten minutes and the kids can be great help with this project!
It's that simple to have your own hand soap, semi homemade!


Here's a nifty little project you can do with hotel soaps or any bar soap bits you have lying around the house.
- Grate soap bits with a cheese grater into a glass dish or double boiler.
- Add boiling water and stir till all the soap is melted.
- Add optional scented oil.
- Allow to cool overnight in a glass dish.
- Stir well.
- Transfer to soap pump with a spoon and large funnel.
It literally takes less than ten minutes and the kids can be great help with this project!
It's that simple to have your own hand soap, semi homemade!

Tuesday, August 4, 2009
My New Sewing Passion: Friendship Bags
I am participating in the Quit Gallery's Friendship Bag Swap in honor of International Friendship Day. Being a newbie to the art of sewing, the project is small enough I can complete in a few hours without a lot of frustration. PERFECT! I've already whipped out two of these and plan to turn out a few more this week to hone my sewing skills.
I should get my partner's information by August 25th. I CAN'T WAIT! Deadline to mail the Friendship Bag is October 6th but I'm sure I'll have mine mailed way earlier!
These would make perfect gifts for teachers, neighbors, hair dresser, or anyone you want to give a chic little gift.


I should get my partner's information by August 25th. I CAN'T WAIT! Deadline to mail the Friendship Bag is October 6th but I'm sure I'll have mine mailed way earlier!
These would make perfect gifts for teachers, neighbors, hair dresser, or anyone you want to give a chic little gift.


Tuesday, June 9, 2009
Applique T-Shirts

Hand applique is a great method to cover up stains, holes or even dress up a plain tee. It can be done in a flash with very little expense. T shirts are easier to applique than you might think. Here's a list of items you'll need to get started:
T shirt
Coordinating fabric*
Embroidery thread & needle
Image for t shirt**
Freezer paper
Heat n Bond Fusible Interfacing
Iron
Scissors or Pinking Shears
Pencil
Embroidery hoop (optional)
Fabric paint (optional)
Coordinating fabric*
Embroidery thread & needle
Image for t shirt**
Freezer paper
Heat n Bond Fusible Interfacing
Iron
Scissors or Pinking Shears
Pencil
Embroidery hoop (optional)
Fabric paint (optional)
*Use outgrown, stained, ripped, or otherwise unworn clothing to reduce your expense on this project and save it from the landfill.
**Someone with artistic talent, can sketch their own image like I did but you can also find great applique images from coloring books. I suggest you start with a simple image until you get comfortable with the process.
See my step by step photo's to help guide you along.


**Someone with artistic talent, can sketch their own image like I did but you can also find great applique images from coloring books. I suggest you start with a simple image until you get comfortable with the process.
- Cut down a section of coordinating fabric to a size slightly larger than your image.
- Trace your applique image onto a section of freezer paper. If you plan to applique multiple fabrics (eyes, lips, hair, etc) then a traced freezer paper image for each fabric is necessary.
- Using medium heat iron setting, iron the freezer paper to the RIGHT side of your fabric.
- Cut down a section of Heat N Bond Fusible Interfacing and iron to the WRONG side of the fabric. Follow the package directions.
- Cut out your image from your interfacing, fabric, freezer paper sandwich and gently peel away freezer paper.
- Arrange your image on your t shirt RIGHT sides up.
- Set aside all pieces except the bottom (or base image) of your applique cut out.
- Iron bottom image to the t shirt per package directions.
- Stitch around edge with embroidery thread.
- Add the next image layer and repeat steps 8 and 9.
See my step by step photo's to help guide you along.


I spruced up a plain long sleeve t shirt I bought on clearance for $3. I already had the other supplies and used old holey t shirts long abandoned for the yellow, white, and orange fabrics. I intended to machine applique the entire project with a zig zag stitch. After starting with the fish body, I discovered I'm just not that good at it yet so I switched to hand stitching. The rest was done by hand very easily. The eye's pupil was back stitched with black embroidery thread.
It took me about two hours while fighting with the sewing machine, watching TV, chatting with hubs, and keeping the cat out of my potted plants. I could have done it MUCH quicker stitching it ALL by hand! {laughing} My next project is to embroider a race car J Man drew a few weeks ago. Cross your fingers and toes everyone!
It took me about two hours while fighting with the sewing machine, watching TV, chatting with hubs, and keeping the cat out of my potted plants. I could have done it MUCH quicker stitching it ALL by hand! {laughing} My next project is to embroider a race car J Man drew a few weeks ago. Cross your fingers and toes everyone!

Monday, June 1, 2009
25 Cheap Ideas for Summer Fun
If you're like me you're wondering what to do now the kids are out of school. Maybe a big vacation isn't in the budget this year! Even if it is you still need something for the kids to do the remaining 18+ weeks of summer! Here's a list of free or almost free activities to get your summer off to a fun start.
- Summer reading program. Our local library conducts a Summer Reading Program every summer. Goals are set and prizes are awarded to each child who reaches them. The program is free if you borrow the books and return them on time.
- Story time. Most libraries and major bookstores also conduct weekly story hours. Larger cities may even have a daily story hour. Check with your local library or bookstore for details.
- Visit a bookstore. Major bookstores have a variety of services you can utilize for free...as long as you stay away from the coffee bar! The bookstore in my hometown even has a small movie screening room where classic/educational movies are shown at no cost.
- Biking and hiking. Many state, city, and community parks offer free biking/hiking trails. Remember to put trash in the designated areas to help preserve nature's beauty.
- Museums tours. While large museums can charge a hefty price for entry, many small community based museums operate on a donation basis. Also check with the larger museums for discount days and special events targeted for summer activities.
- Pitch a tent. Camping doesn't have to cost anything. Pitching a tent in your back yard or living room can be a special treat for even the biggest of kids. The convenience of a bathroom and your own groceries makes this a virtually free activity. If you camp in an RV, here's a listing of places to camp for FREE or almost free.
- Hit the playground. Playgrounds are free and there's usually one in every community.
- Go to school. Many schools open their gym doors during the summer months to encourage youth activity in the summer. Check with your local school for details.
- Watch a movie. While going to a movie theater can easily break the bank, there are great ways to significantly reduce the cost. AMC theaters offer special promotions on food, showtimes, and bulk ticket buying. Drive-ins, matinee's, and theater specials are a great way to enjoy a movie at a low cost. If the theater isn't in the budget, renting movies can be much cheaper with the many $1 rental options these days. Be sure to check for free rental codes for Red Box online.
- Hunt for Geocache. This is a relatively new sport utilizing GPS coordinates to hunt for treasure. If you're cell phone is already equipped with GPS then you're ready to go. Many state parks (including all Minnesota State Parks) are getting in on the sport. They provide free handheld GPS units for use on park premisis. Check with your state's park website for details.
- Search for benchmarks. If geocaching is a little intimidating for you or you don't have access to GPS unit then benchmarking may be for you. Simply stated, it's a hunt for survey markers and/or landmarks. We did this last year after moving to Hallock to help get to know the area better. It worked!
- Fun at festivals. Summer time is the time for festivals but be forewarned some charge at hefty price while others are totally free so be sure to call ahead for pricing.
- Go swimming. Lots of community pools are free (or nearly free) to it's residents. Our local pool offers FREE swimming classes courtesy of the Red Cross and the school district.
- Visit your state's parks. Summer is when state park's kick things into high gear. There's special programs from hiking to swimming to camping to fishing to horse back riding. Most of these programs are low to no cost and family friendly. Minnesota helps pay for park improvements and maintenance through parking passes. A daily pass is around $5 while an annual pass is $25 which is well worth it if you plan to visit a park several times. Be sure to check with your state's park website for schedules, pricing, and details.
- Get in the garden. Grab some seeds and dirt then get dirty. We're growing watermelon seedlings on the counter till their big enough to put in the garden but you can plant any seed to see what happens. Grow them in the garden, pots, vases, or any container you have lying around the house.
- Make music. Pull out pots, pans, cereal boxes, empty flower pots, shoe boxes, or whatever you have around the house and beat the tune of a different kind of drummer! Try filling wine glasses with different levels of water to see if you and your kiddo can make music by rubbing the rim of the glass.
- Get artsy. Take art outside with sidewalk chalk. Paint a flower pot, bench, or section of wood for a decorative addition to your front porch. Grab leaves, flowers or twigs to paint with or make a nature collage.
- Bike Rodeo. Organize a bike rodeo or neighborhood ride with the neighbors and their kids. Make sure everyone's knows to wear the proper safety equipment when riding. If you're organizing a rodeo then you'll need a liability waiver.
- Sew something. If you need a break from the great outdoors then, organize an indoor sewing activity. Yarn, carboard cereal box, and a hole punch can make for hours of fun for a little one. For older kids, sew up a nifty drawstring bag.
- Get cooking. Kids are ALWAYS hungry during the summer months so make it easier to feed them by getting their help in the kitchen. Here are some fun snack ideas kids can make with a little help from you!
- Take a tour. Many businesses, factories, farms, etc offer free tours to the public. Check online or call for details.
- Go on a bug hunt. Grab a magnifying glass, camera, bug book, and a journal for a fun backyard activity guaranteed to keep the kids busy all summer.
- Bird watch. If birds are your thing, then have the kids put out a few bird feeders and identify birds that visit your yard. A cheap bird feeder can be made with wood or a pinecone smothered in peanut butter and coated with birdseed. Make sure to hang them near windows so you can enjoy the view.
- Water Water everywhere. Grab a sprinker or water guns for some water fun to beat the summer heat. To avoid increasing your water bill, use collected rain water to refill water guns.
- Get sporty. Join in a football scrimmage, soccer game, baseball team, tennis, volleyball, etc to keep the kids active all summer long. Make sure everyone stays properly hydrated and check for pricing before signing up.
Thursday, May 28, 2009
Craft Challenge Voting Begins
Christy Nelson's May Craft Challenge is open for voting. The poll closes at midnight Friday so get your votes in early. I entered my Spring Clipboard I shared with you earlier this week. You can either visit Christy's site, view the images and vote for your favorite there...OR you could just vote for mine from the embedded pole!!! {wink wink}
There are some really creative submissions. If I didn't enter, I would have voted for the Flower Fairy because she's so darn cute!
I had so much fun with this, even if I don't win, it was worth it. I may even sign up for next month's Craft Challenge!
While you in a voting mood, don't forget to vote for my dresser (Entry #2) at Fresh Nest's Design Challenge. Daniel would love a new bed!
Thanks so much for voting for me! Let me know if you ever need a vote so I can support you too! We all gotta stick together!
Wednesday, May 27, 2009
Homemade Cane Fishing Pole
The other day, I gave you a few family friendly fishing tips since our holiday plan was to take the kids fishing. Today, I'd like to share my favorite fishing method as well as how to make a fishing pole of your very own.
I love to fish as much, if not more than, my husband but fishing gear can get quite expensive. In an effort to keep more money in my pocket than in my fishing gear, I prefer to fish with a homemade cane fishing pole. I've had more luck with a cane pole than my husband has with his store bought fishing pole. I've caught catfish, blue gill, crappie, and many other fish off a cane pole.
Cane fishing poles are very easy to make requiring a few minutes of assembly along with a few supplies you probably have in your tackle box.
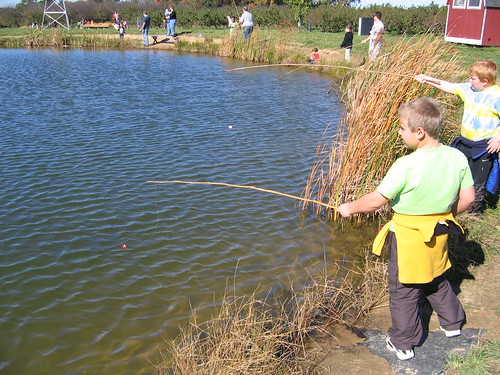
How to make a cane fishing pole.
This is VERY user friendly fishing gear even the kids can craft. My kids prefer fishing with a cane pole and find it easier to catch fish. I use smaller sticks and shorter line for their poles. With a cane fishing pole, they don't have to figure out how to time the casting and the line always goes where they want it! When they get a bite, all they have to do is snatch the pole up and their fish is caught.
Storage is simple. When you are done fishing, either wrap the line around the pole securing the hook to the pole or remove the fishing line, toss the stick in the woods or the water, and place the line back in your tackle box for next trip. NEVER toss used fishing line in the water-other fish can get tangled, it can snag on a boater's engine propellers, or further endanger other wildlife. Be smart when you fish and leave the area like you find it to preserve it for the next person.
I love to fish as much, if not more than, my husband but fishing gear can get quite expensive. In an effort to keep more money in my pocket than in my fishing gear, I prefer to fish with a homemade cane fishing pole. I've had more luck with a cane pole than my husband has with his store bought fishing pole. I've caught catfish, blue gill, crappie, and many other fish off a cane pole.
Cane fishing poles are very easy to make requiring a few minutes of assembly along with a few supplies you probably have in your tackle box.
How to make a cane fishing pole.
- Find a long straight stick (NOT a thin switch) at least five feet long that bends slightly when pulled at one end. You want a little give but not too much or you will never get your fish to the shore. A stick too dry will break when you try to bring a fish in while a stick too long or short may be difficult to handle when pulling your fish to the bank. Trial and error is the best way to find the right length and diameter. You might prefer a long fishing pole but I prefer the handling of one a little shorter than my height. I suggest you start with a length around your height making adjustments until you find something you are comfortable with.
- Cut some fishing line at least one plus a half the length of your pole. If in doubt cut it double the length or longer. Length of the needed fishing line depends on where you're fishing (dock, bank, around logs, etc) but I air on the side of caution by cutting my line longer.
- Wrap your fishing line a few inches from end of the stick several times and tie it off pulling hard to make sure the knot is secure.
- Tie a hook to the other end of your line, add any weights, bobbers, lures, etc.
- Add your bait then toss in your line.
This is VERY user friendly fishing gear even the kids can craft. My kids prefer fishing with a cane pole and find it easier to catch fish. I use smaller sticks and shorter line for their poles. With a cane fishing pole, they don't have to figure out how to time the casting and the line always goes where they want it! When they get a bite, all they have to do is snatch the pole up and their fish is caught.
Storage is simple. When you are done fishing, either wrap the line around the pole securing the hook to the pole or remove the fishing line, toss the stick in the woods or the water, and place the line back in your tackle box for next trip. NEVER toss used fishing line in the water-other fish can get tangled, it can snag on a boater's engine propellers, or further endanger other wildlife. Be smart when you fish and leave the area like you find it to preserve it for the next person.
Here are some great fishing resources to get your fishing trip started!
Tying a Clinch Knot -the knot I use to attach my hook to my line plus they have other great knots you can use too.
Here's a more professional method of creating a cane pole.
Learn about your states fishing license regulations, marina locations, family hot spots, fishing reports, and MUCH more information here.
Here's a more professional method of creating a cane pole.
Learn about your states fishing license regulations, marina locations, family hot spots, fishing reports, and MUCH more information here.
Saturday, May 23, 2009
Spring Clipboard Craft
With a few items and a creative spark, you can have a fun and attractive clipboard. This is a great & inexpensive way to spruce up your office area, jazz up a locker, or add some spunk to a dorm room.
 Here's a super easy way to make your own Spring Clipboard!
Gather your supplies:
- clipboard
- scissors
- scrapbook paper
- fabric
- silk flowers
- floral wire (optional)
- polyurethane
- mineral spirits
- foam paint brush
- fine grit sandpaper
- trash twist tie
- hot glue gun
Tie the clipboard clip open with the twist tie. This will help in the next step.
With your foam paint brush, spread a light layer of clear polyurethane on the clipboard. Add your fabric adjusting it till your happy with it's placement. Spread another layer of clear poly over the fabric. Place your paper pieces according to your design. Apply several layers of clear polyurethane to the entire clipboard until it is thick enough to provide a smooth writing surface. Allow each coat to dry in between. Sand any air bubbles to obtain a glassy smooth surface.
Create your pen holder by wrapping half the length of the floral wire around a skinny marker or an over-sized pen. Add any embellishments like buttons or ribbon. Use the other half of the floral wire to hook to the small hole on the clipboard's back.
Add your flower to the clip with a dab of hot glue.

 You can make this using photos, newspaper clippings, post cards, etc. Pinking shears would also add a little something to the fabric design but I don't have any so I just trimmed mine with a straight edge and rotary cutter. You can also use modge podge or even a paint glaze instead of the clear polyurethane. No matter how you put it it together, this makes a great gift and can be customized to fit anyone's personality and home decor!
I was inspired by Christy Nelson's May Craft Challenge. Once you sign up for her challenge, Christy sends you the SUPER SECRET craft packet along with the directions on how the challenge works. Once you get your crafty goodies, then it's up to you to create something unique and upload the photos to her Flickr group. I can add anything to the list of Christy's supplies but I had to use at least a little bit of EVERYTHING she sent. This is where it gets challenging!
So what did you create this month???
Subscribe to:
Posts (Atom)